Database user's manual
Table of Contents
This page is for people who fill the TiMMA database. If you wish to see the published finds, please visit the Browse collections page.
Get your marks
Request access
Access to the database must be requested to bastien.rueff@efa.gr.
Tabs
The database is composed of 5 main tabs, sometimes divided in multiple sub-tabs, linked together by 1-to-n or n-to-n relationships. A tab (or resource template) is a thematic group of items (or entries).
1. Location
Describes every location, namely sites and buildings, in which timber evidence and structural units have been found.
2. Space
Describes the spaces in which structural units and timber evidence have been found, such as rooms, staircases, roads, corridors, etc.
3. Structural Unit
Describes structural units. It is divided into 20 sub-tabs corresponding to the different structural units one might encounter on the field.
4. Timber Evidence
Describes timber evidence. It is divided into 10 sub-tabs corresponding to the different timber evidence one might encounter on the field.
5. Charcoals and Preserved Wood
Describes charcoals and wood resources.
The shortest path to fill in the tabs is the following one:

However, it is not mandatory to fill them all at once. The filling strategy is to be discussed with your team.
Item
Items are single entries corresponding to the description of every location, space, structural unit, timber evidence, charcoal and preserved wood. Apart from bibliographical references, each item must be given a Unique Key number (see below, Insert values).
Items are listed in the Items tab (the box icon) in the left-hand navigation of the administrative dashboard.
To quickly view the basic information about an item, click the ‘Details (ellipsis)’ button in the row for the item, located next to the edit and delete buttons. This will open a drawer to the right of the list which displays the item’s title, description, visibility, any sites it is used in, and its associated media.
For a more detailed look at an individual item, click on its title in the items browse table or when viewing its details
To add a new item, see below (Insert values).
Item sets
Item sets are aggregations of items. In Omeka S, items may belong to any number of sets, and an item set can have any number of items. Item sets are managed via the ‘Item sets’ tab (the icon of three stacked boxes) located in the left-hand navigation of the admin dashboard.
Vocabularies
The database uses three semantic web vocabularies:
- Dublin Core for the title of each entity
- Getty Museum's Thesaurus Art & Architecture for charcoals and preserved wood species identification
- Timma Project Ontology for all the other fields
The latter has been created for the purposes of this project. We use interoperable standards (turtle and JSON-LD) in order to make our model of data available to any other project related to timber and wood resources.
Add a new item
Workflow
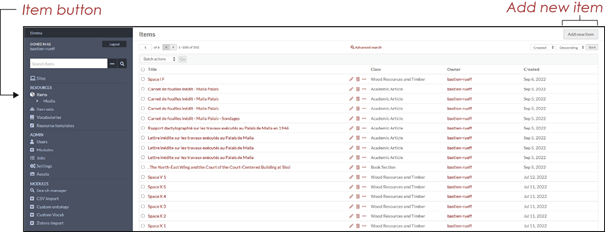
To create a new item, click on the ‘Item’ button in the control panel and then on the ‘Add new item’ button in the top right corner of the window.
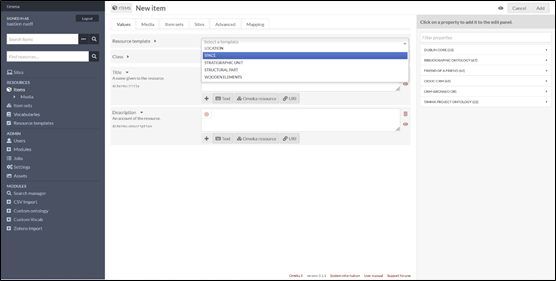
Select in the ‘Resource template’ list the tab to be filled in.
Example: 1. LOCATION

The same path must be followed for each tab.
- You are driven by default to the ‘Values’ panel. Fill the cells following the guideline on the left.
- Click on the ‘Media’ button and import as many pictures as you want.
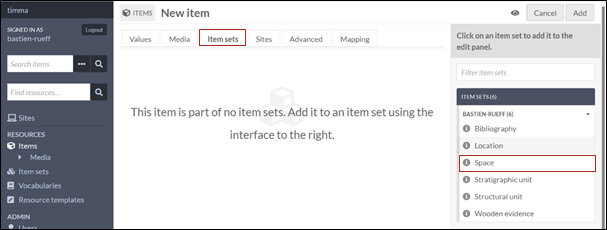
- Click on the ‘Item sets’ button and link the current item to its item set.
Example: A LOCATION item must be linked to the LOCATION item set
- Click on the ‘Sites’ button and activate or disactivate the publication mode of the current item. The visibility of each item is set by default. This means that the item will be automatically published on the TiMMA website, unless you disactivate it.

Insert values
Unique key numbers
Before creating any new item, make sure that it has not already been created.
To this end, you must refer to the ‘TIMMA DATABASE CODES’ sheet, following this link:
https://docs.google.com/spreadsheets/d/1jWV46IKfDMUwUTZQEX51VN2C9zlzf7D42xLIWztq-jI/edit#gid=0
If this is the first time you are using this sheet, you may request access by sending an email to bastien.rueff@efa.gr.
The sheet is composed of several tabs named after those in the database.
|
LOCATION |
SPACE |
STRUCTURAL UNITS |
TIMBER EVIDENCE |
WOOD RESOURCES AND CHARCOALS |
Click on the relevant one and use the filters to search if the item you are going to create already exists or not.
If the item does not already exist, you must give it a unique key number (UK). This will prevent from duplicates and give every entry a single identification code.
To do so, use the first available UK in the relevant tab of the ‘TIMMA DATABASE CODES’ sheet and fill the corresponding cells. Make sure that there are no filters at this moment as this could cause duplicates.
Example: the first location item is given the following information
|
UK |
SITE |
AREA |
BUILDING |
|
Loc1 |
Malia |
Palace |
Palace |
This UK must then be reported to the first cell - ‘Code name (Unique Key)’ - of the tab you are about to fill in (in this case, the LOCATION tab).
Fill the cells
Each cell is preceded by a field label. Underneath is a guideline you may want to read as it defines the kind of cell you are dealing with.
There are three kind of cells:
- Free text cells
In the cell, type any useful information according to the guideline

- Items
Link the current item to one or several other items

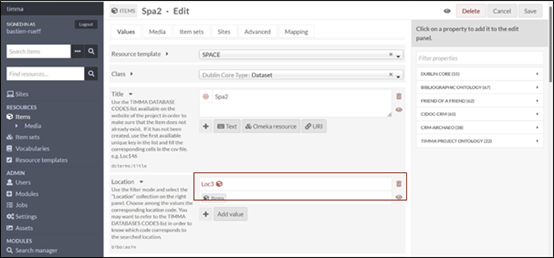
- List of values
Choose from the values in the dropdown menu
Add values
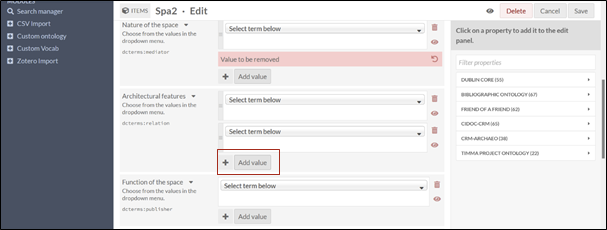
Although there is one cell per field by default, multiple cells can be added when several values are required. To this end, click on the ‘Add values’ button.
Example: in the ‘SPACE’ tab, the field ‘Function of the space’ is intended to detail what the space was used for. As spaces can be multifunctional, you may need to add values.
Example: In the ‘TIMBER EVIDENCE’ tab, the field ‘Space’ is intended to link every timber evidence to one or several spaces. In the case of a doorframe for instance, it is necessary to link the structural unit and timber evidence to two different spaces by adding values.
Add bibliography
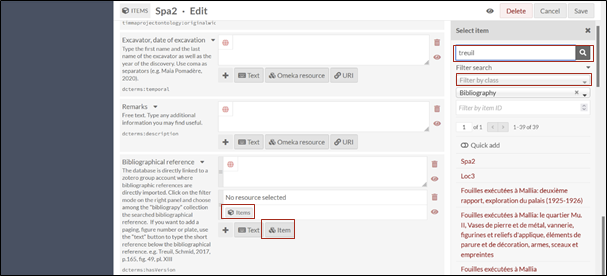
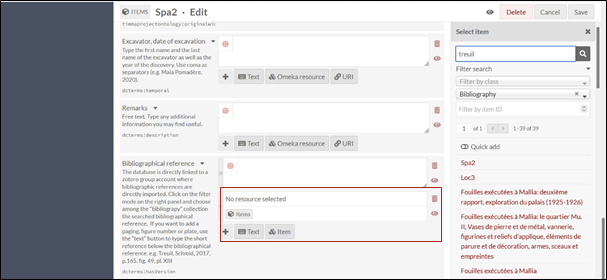
The cell ‘Bibliography’ is intended to add bibliographical references. Please, note that the database is directly linked to a Zotero group from which bibliographic references are directly imported. In order to add bibliographical references, click on the ‘Items’ button and choose in the ‘Filter search’ the ‘Bibliography’ item set. Type any words of the title or one of the authors’ names in the search bar (e.g. Treuil) and click on the magnifying glass symbol.
Once found, click on the searched bibliographical reference in the right panel and press the ‘Select resource’ button in the bottom right corner.
In case the searched reference is not present, send an email to bastien.rueff@efa.gr. It will be added almost immediately. If you are familiar with Zotero or wish to become so, feel free to request a contributor role and read the 'How to use the Zotero library' section. You will then be able to add new bibliographical references by yourself.
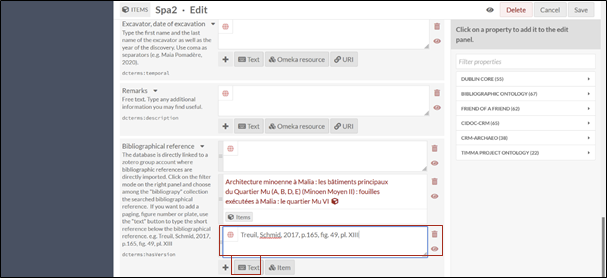
If you want to add a paging, figure number or plate, use the ‘Text’ button underneath to type the short reference:
Example: Treuil, Schmid, 2017, p.165, fig. 49, pl. XIII.
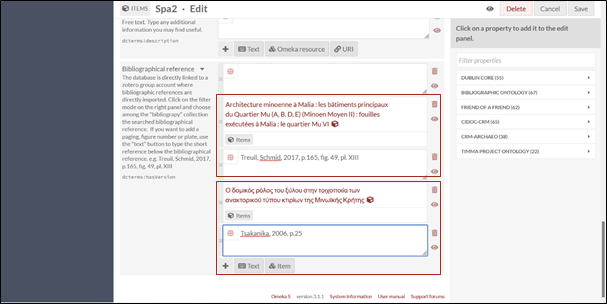
In case of several bibliographical references and in order to avoid any confusion, make sure that every short reference follows the full bibliographical reference it is connected with.
Upload media
In the upper part of the window, you can upload as many pictures, sketches and drawings as you want, by clicking on the ‘Media’ button.

For each uploaded media, type in the title cell its name, using the following codes separated with underscores:
The nature of the document:
- Photograph = Ph
- 3D model / photogrammetry = 3D
- Sketch = Sk
- Drawing = Dr
- Plan = Pl
The site:
- Malia = Mal
- Zakros = Zak
- Ayia Triada = Ayia
- Phaistos = Pha
- Akrotiri = Akr
- Pylos = Pyl
The UK number(s) of the elements depicted on the illustration
- Tim135
- Tim135_Tim140
- Tim135_Str2
When multiple media have the same name, please use numerical enumeration: 001, 002, 003, and so on.
Should they be intended to be published, preferably use a .tiff format. Any other format suits for work documents.
If the image to be uploaded is already available from a digital library and has a IIIF (International Image Interoperability Framework) format, you can directly upload it, using the ‘Image IIIF’ button. To do so, you simply need to copy / paste its IIIF link.
Example: images from the French School at Athens “Archimage” digital library can be used as follows:
- Right click on the ‘IIIF JSON’ button and copy the image
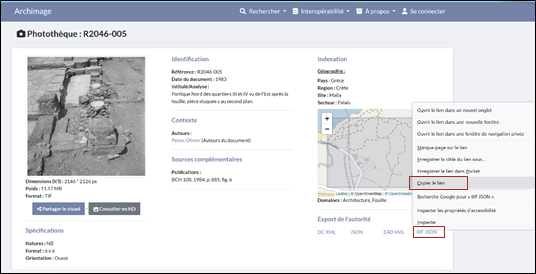
In the ‘Media’ panel of the database, click on ‘Image IIIF’ and paste the link into the relevant cell.

Link data to their item set
Each item should be linked to an item set. To this end, click on the ‘Item sets’ button in the upper part of the window and select the relevant item set in the panel on the right
Example: for a ‘Space’ item, select the ‘Space’ item set.
Publish / unpublish data
Last, but not least, the ‘Sites’ button is dedicated to the publication of data. By default, the items are published on the website. Should you prefer them not to be published, click on the trashbin symbol. They will no longer be visible.

You may now proceed with adding the item by clicking on the ‘Add’ button in the top right corner.
Duplicate / edit / delete items
In order to duplicate, edit or delete items, respectively click on the plus, the pencil and the trashbin.
